Showing posts with label Lumiere. Show all posts

Friday, April 25, 2014

$7 Shoe Conversion - Flying Unicorn

Hi Everyone, 

Yep I am back with another bargain shoe makeover!

Anyone who knows me well enough knows full well I can sniff out a bargain a mile away, blessed with rather large feet I always manage to find my size on the clearance rack at Target. When I spotted these previously black leather numbers for $7 I knew immediately they would be coming home for a makeover. I could have really gone over the top with embellishing these however it would be a shame to never wear them and I want that chance one day. 

Products Used


Did you know Flying Unicorn Store stocks Lumiere paints in a handy small size multi packet? If you are looking to try these paints I can HIGHLY recommend them as they are brilliant.

Thanks for looking everyone, I wish you a brilliant and creative day.

~ Rebecca ~

Saturday, February 8, 2014

Leather Bag Conversion - Flying Unicorn

Hi Everyone,

I am here today with you to share with you a little upcyling project. Recently my husband was super lucky to get upgraded to first class on his Emirates flight, he brought home with him a leather Bvlgari (fancy pants) toiletry bag.

Although very nice....


I wanted it to look nicer, and here is the result....


I decorated the bag with Flying Unicorn Adornments and chipboard watch pieces from Leaky Shed Studio. The beautiful shimmery paint is Lumiere by Jacquard, it went onto the leather like a dream. This then led me to look at my shoes and wonder which ones I would like to paint, dare I take to a pair of leather boots with this paint? yes I think so!!!!.  When it comes to Rub'n Buff I seriously (and I mean SERIOUSLY) cannot seem to help myself, I love that stuff and have used it here in gold to highlite my edges and embellishments. I use it on nearly everything and somehow always manage to rock a gold index finger.

Here are a few more pictures for you...


Products Used
Many thanks for looking, wishing you all a brilliant and creative day. 
~ Bex ~ 

Tuesday, January 28, 2014

Finnabair Inspired Gift Tags

Hi Everyone,

I am here today share with you a couple of Finnabair inspired tags. I thoroughly enjoyed making these tags, I find craft such a therapeutic experience, I really go into my zone (it is almost meditative!!). I took my time choosing my adornments and gluing them into place, such fun. I have used Flying Unicorn Adornments for these tags as well some watch part chippies from Leaky Shed Studio. We all know I love myself some Lumiere paints and these paints are what has created the amazing color you can see here.

Products Used


Thank you all for looking, I wish you all a happy and creative week.

~ Bex ~

Monday, January 6, 2014

Finnabair Art Journal Cover - Flying Unicorn

Words cannot express how excited I was to find out there was an art journal in January's kit by Flying Unicorn, and not just any art journal, Finnabairs journal (LOVE!). Now I had every intention of filling the book first and decorating my cover last, ahhhhh who was I kidding, I could not wait to start the cover. 

Update to post, wow since sharing this project I have had an amazingly huge amount of positive feedback (thank you all so much!!). A lot of people have asked, how did you do this? I am about to share that with you all. 

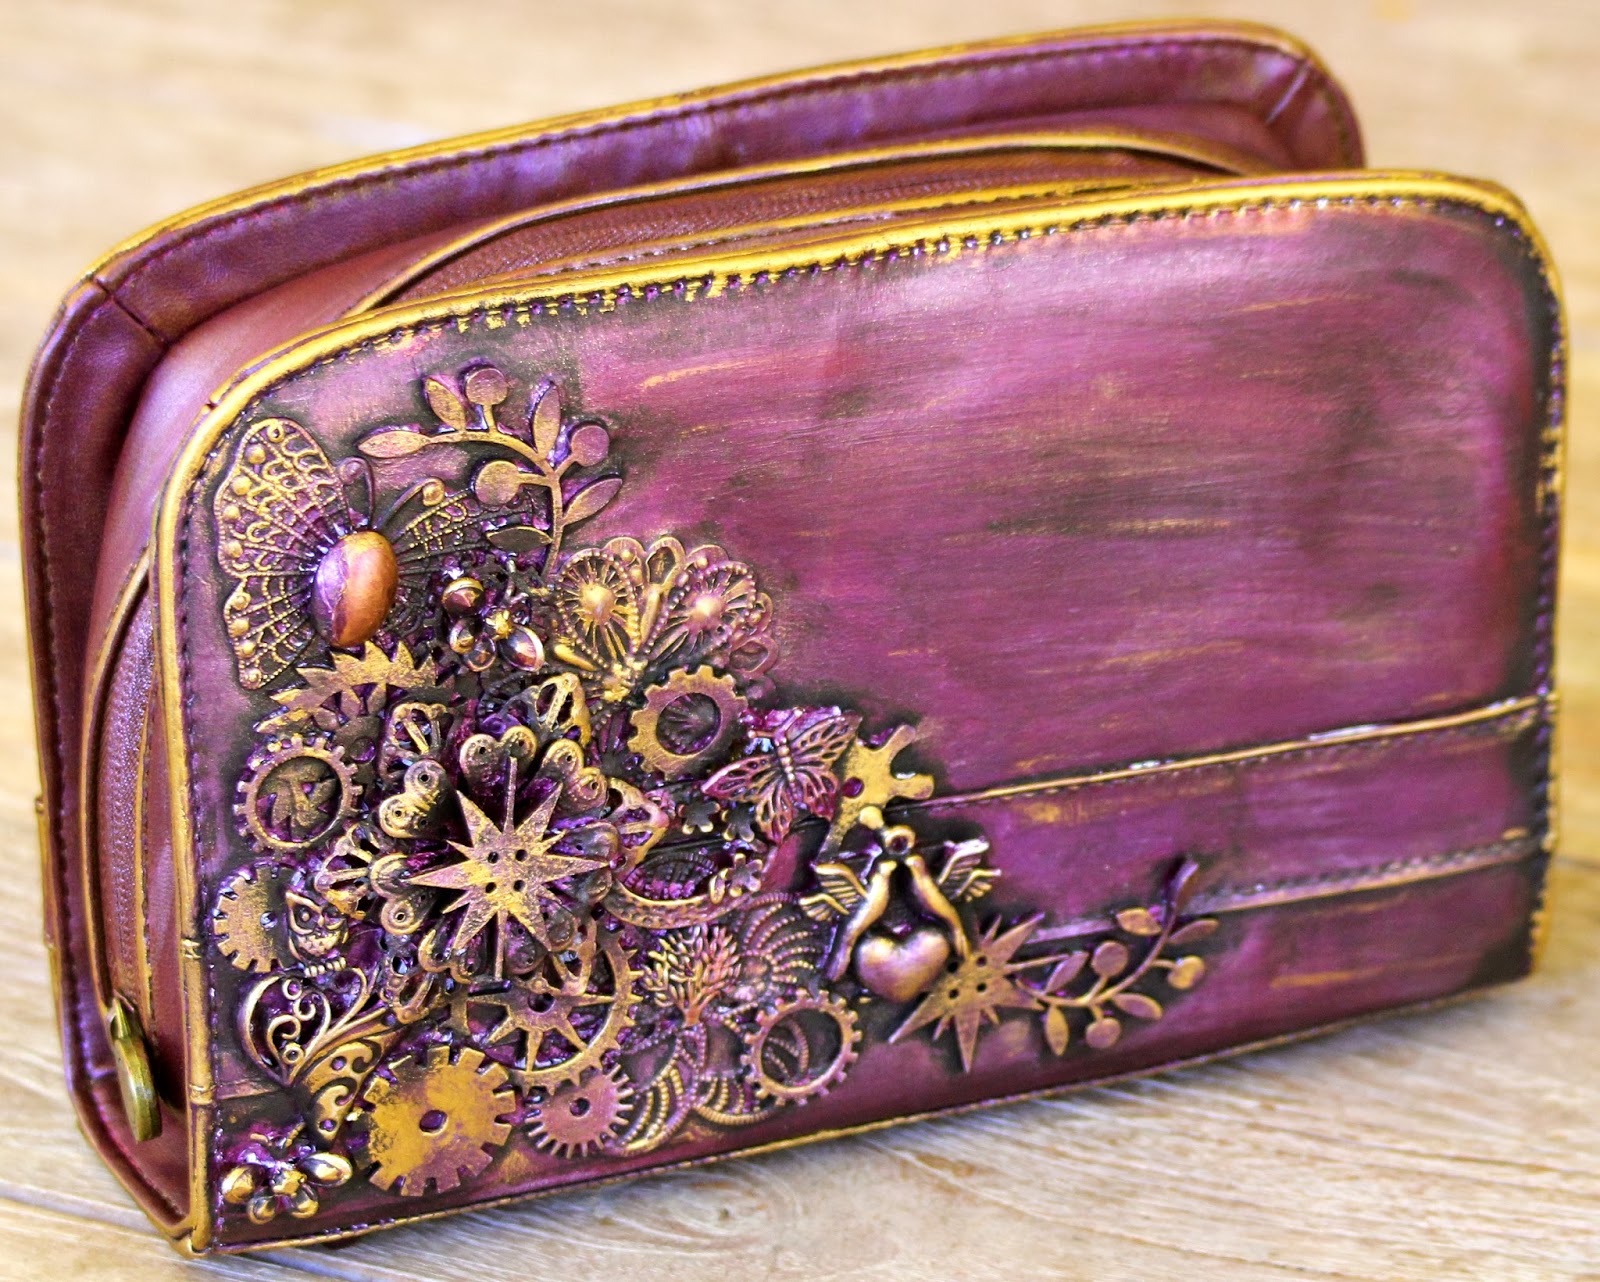
I started off by covering my cover with a coat of gesso and allowing to dry. I then took a whole bunch of random stuff and glued it to my cover, I used Glossy Accent's to glue my stuff down, yes an expensive choice but it works. As you can see I have used heaps of different types of objects, lace, metal, chipboard, flowers, resin pieces, fimo set pieces and die cut card. Really anything will work here, buttons, rings pulls from cans, etc. Take a look at what you have laying around. 


Once everything is glued down and dry, you then apply a decent coat of white gesso. Ensure your brush gets into all those small places, everything must be coated.
 

I would recommend leaving overnight to dry, lesson learnt I started applying my paint too early and started to get messy. Once your gesso is 100% dry you then can start applying your paint. I gave the entire cover a coat of Halo Blue Gold Lumiere Paint and then randomly dabbed on Metallic Rust and Pearlescent Blue Lumiere Paints. The glimmering gold addition came from my Antique Gold Rub'n Buf. I LOVE this stuff, one little tube can go such a long way. Apply a little (and I do mean little) bit to your finger and start applying to raised areas. 

The end result is rather spectacular, yes even if I do say so myself. I am going to go out on a limb here and say if you want to give this project a go that it is almost impossible to stuff up. You can see above what I started with, a whole bunch of random bits and bobs. 


Products Used
Gesso


Thanks for looking everyone, have a great day.

~ Rebecca ~