Hi Everyone, Very happy to share with you today a tag which has been created for the Flying Unicorn Creation Team. This tag has been created using Silks Paints, Flying Unicorn Adornments and Prima Butterfly Wings. Hope you like it, if you have any questions please feel free to ask.
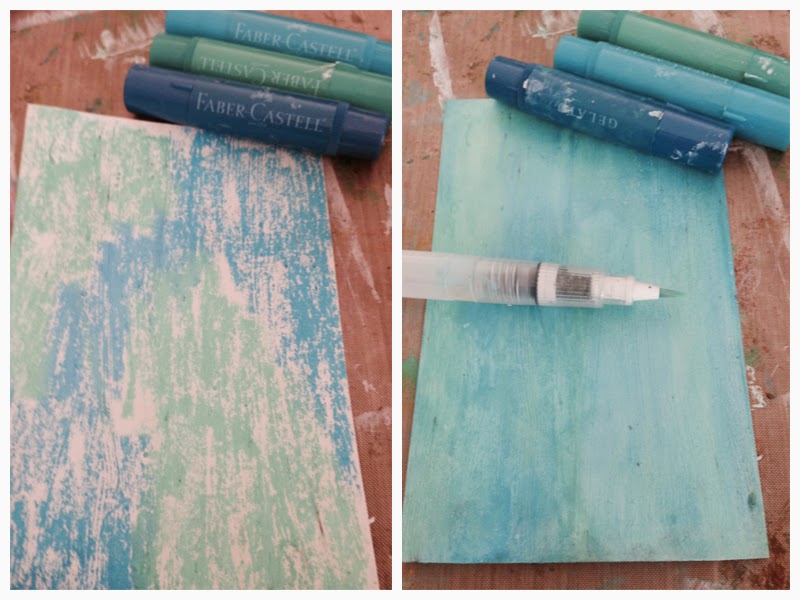
Hi Everyone, I am happy to be hosting the mid month mixed media art journal challenge at Flying Unicorn. For the challenge I created this little canvas and tutorial. I hope you enjoy it.
Using a small amount of glossy accent glue down a selection of different coloured Art Ingredients Glass Beads. I used the colours Plum and Zinc.
Trace around all your petals, grass, bubbles etc with PITT artist pen in black and smudge slightly with a damp finger (time to get those hands super messy!)
Add words of your choice, this was last minute addition for me as I thought it needed something else. These ones are Tim Holtz ideology Chit Chat.
Hi Everyone, I am here today to share with you all a 4" x 6" mixed media canvas. This canvas has been created with a combination of Flying Unicorn Adornments and chipboard. To create my colours I chose to use Primary Elements powders by LuminArte. I added a very small amount into a mister with water and it created a stunning and colorful spray. Have you tried Primary Elements yet? AMAZING!!.
Today I would like to share with you a little Tim Holtz inspired canvas. This has been created to showcase a few of my gorgeous treasured Flying Unicorn Adornments. I love them so much!! Sometimes I even feel a little sad when I glue then down, a loss to my little box of Flying Unicorn treasures. However don't they make a project just pop? Just look at them!
Also popping this project is tissue paper, such an easy and inexpensive way to create texture. My background is tissue paper adhered with gel medium, texture paste through a stencil and then coloured with various shades of distress ink with a foam pad. I love the grungy vintage look, makes my little found relative family look dark and mysterious.
Today I would like to share with you a project I am pretty excited about, pretty excited because steampunk style is probably my favourite crafting style. Quite a few hours went into this project, actually it was created over a few weeks, just a little bit at a time here and there. The end result I am pretty proud of, this shadow box now has pride of place on display in my craft room.
As there were many many steps involved in creating this project I have condensed down into a few separate steps.
Two contrasting shades of Silks (African Jade / Rich Cobalt) were painted around the copper crackle.
Heavy Gesso (Black) was applied with a paint brush over the entire frame, making sure I pushed my brush right down into all those amazing cracks. When it became slightly opaque I began rubbing it back with a baby wipe.
Just LOOK at those amazing cracks!!! ~LOVE~
Randomly stamp, stamp stamp the edges with Circles and Adverts stamps.
Using my finger a small amount of Gold Leaf Rub'n Buff was applied to all edges of the frame.
All my cogs were foam mounted at different levels.
Now there is where it gets tricky to explain, I just kept adding and adding and adding. I very rarely know when to stop, and even now I can see little spots where I could have put even more.
Hanging bottles - contain Art Ingredients Glass Beads - Licorice and Butter
Jump rings glued randomly in the background, filled with glossy accents to give a wet raindrop look.
Muslin was glued to the bottom of the frame, scattered watch parts were glued into place.
Who can spot the champagne cap? just couldn't help myself.
I understand there are many steps involved here and if you have any questions at all I am happy for you to contact me directly for help if you need it.
Bex here today to share with you my decorated paper mache mannequin (from Sep KOM and also available in store).
I started my project by giving my mannequin a coat of Kroma Crackler in color silver. When this had dried and became all crackly I lightly sponged Vintage Photo Distress Ink and also added a small amount of Gold Leaf Rub'n Buff. To create my dress skirt I used folded sheet music and lace, layered over the top with sewn material strips.
To me what really makes this dress pop is the Flying Unicorn Adornments used for the belt and the necklace. I so LOVE Flying Unicorn Adornments.
This month I am happy to bring to you a little book makeover. This beautiful old book was once a beloved encyclopedia. Now I am sure the majority of us are old enough to remember these in book form. These days you will find them on DVD's or not used at all with people relying on our good old friend Mr Google. So if you have an old encyclopedia lying around, don't throw it out, give it a beautiful makeover.
I have always wanted to try a folded book, always throwing myself in at the deep end I tried to go with a more complicated fold for my first attempt. There were a few mishaps along the way, but in the end it worked and I am super happy.
Art Extravagance Texture Paste in Clear Crackle gave my book a beautiful vintage look, here is a close up.
As my tutorial is very photo heavy I have made it into a picture YouTube video for you all to watch.
Please sit back and enjoy watching how the book jacket evolved from start to finish.
I don't know about your corner of the world but here in Australia, steamy hot November weather is just around the corner...now for anyone who knows me, they will know I detest summer. Winter is my favourite season and thought of wearing boots and jumpers makes me happy. So as most of you enter the lovely cool winter months.....
The Finnabair Creative Team have come up with a special challenge to warm you up and possibly inspire to create some fantastic art. Feel most welcome to join in!
Here's how our Cosy Challenge works:
First of all, make sure you blog hop with our Creative Team. Below you can see the list of all the blogs where you can find lots of warm and fuzzy inspirations. Make yourself a huge cup of hot tea and visit each of the Ladies to see their Cosy interpretations of the challenge. Don't forget to leave a warm comment! :)
If you do, we have a fun challenge for you and a great prize to win!
Here's what you can do:
1) Find a photo that will serve as a Cosy inspirational jumping point for you. It can be any image from the internet or a photo you take yourself;
2) Create a work (layout, collage, canvas, cards - anything goes) that represents the concept of coziness;
3) Go to Finnabair's blog and leave a link to your work. You have two weeks to send in the submissions - 'till November 8th. Then, our Team will choose a winner.
We can't wait to see your cosy creations!
Now I am very happy to share with you my interpretation of warm and cosy. I have decided to choose what I feel is a warm and cosy colour palette. The photo I have used is of a stylish lady dressed in a fine hat and warm winter clothes, what stylish lady is complete without a set of jump ring spectacles though? ;-)
Many many thanks for joining in on our blog hop, I cannot wait to see some of your warm and cosy creations. Please if you have any questions about my project feel free to ask.
Wishing you all a very happy and creative weekend.
Ooooh when I received a balsa wood coffin in my design team box I was a little unsure which direction to head with it. I never personally get involved with Halloween (not too many do in Australia) so I decided not venture in the creepy direction. I thought was it possible to make a coffin beautiful? a beautiful final resting place. Yes I think so, this is what I came up with.