Hi Everyone,
I am here today to share with you a little trash to treasure make over. I am never one to throw away a good box, I will always tuck it away in a cupboard for a future craft project. This one in particular was a beautiful strong box and the fact it smelt fabulous was just an added bonus.
To begin my project I removed the decorative ribbon and traced an outline of the lid onto white card stock. As I would be adding a new top and also new sides to the lid and base to the box I also cut a long thick strip (the width of box and side of lid) of white card stock (this will be trimmed later to form my sides). Both my circle and long strip were given a thin coat of
Art Basics Heavy White Gesso.
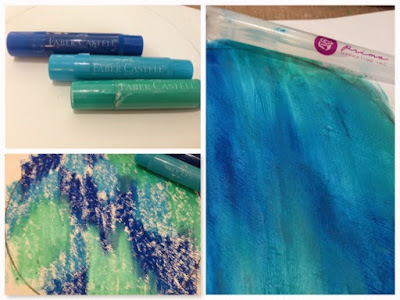
For my background colour I chose three colors of Faber Castell Gelatos,
Blueberry,
Metallic Mint and
Snow Cone. As you can see below I randomly scribbled my gelatos and then blended them with my
Prima Watercolor Brush Pen. In areas where I wanted harder blending I rubbed gently with my finger, yes you get a blue finger, but for the sake of art it is worth it right?
At this point in time I did not want to use my heat gun to dry the soft gloss gel so placed my stencil sheets out in the sun to allow ample time to dry naturally. In the meantime I took the base and lid of my box and firstly gave it a coat of
Art Basics Heavy Black Gesso. As I will be using my coloured paper strips to cover the box later there was no point to paint the entire box and waste my gesso. Once the gesso was dry I applied a coat of A
rt Basics Soft Gloss Gel, this gave the black a gorgeous shine.

Although I loved my shades of blue and green I really wanted to add more colour and what better than pink in a beautiful sparkle and shine of
Pink Mica Powder. To apply the powder I gently sprinkled some on using the end of my palette knife. Once sprinkled I misted with water and let it run slightly. Go gently with the powder a little goes a long way, always best to start with less, you can always add more. At this point I dried with my heat gun, something magical happened, the gel bubbled (and even popped in places), the mica powder set into the gel, it looked amazing, I was happy.
I cut my circle top and then measured and cut my box lid and base side. Using a black PITT pen I outlined a few squares of soft gloss gel and also the edges of my top and sides. I am not a sewer, so when it comes to sewing crooked lines I am a master, I quickly and crookedly zipped around the around the edges twice in black thread.
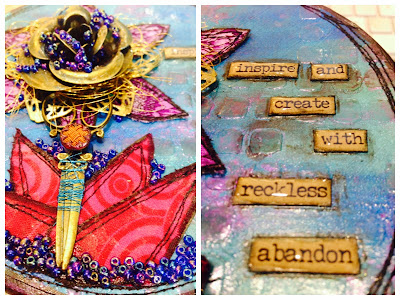
The create my flower base I used scrap material. I cut leaf shapes which were glued onto card stock and then crookedly stitched on my sewing machine (and then also outlined with black PITT pen and smudged). My metal embellishments were stacked on top of gold metallic sewing thread, I also wrapped blue metallic thread around my scissor flower base. Upon the scissor centre you will see a vintage button. To make my wording pop I have outlined with a
black water colour pencil and used a
water color brush pen to blend it in.
Cobalt Blue Glass Beads, these are my FAVOURITES, I just love them so. They were added to my flower centre, around my leaves and at the base. To add dimension to my wording I very carefully applied some
glossy accents.
Many thanks for looking, I wish you all a very happy and creative day.
~ Rebecca ~
Products Used


